Fix ‘Windows Cannot Be Installed to This Disk MBR’ – EaseUS
Solutions on this page work to fix Windows cannot be installed to this disk MBR in Windows 11/10/8/7. Go and see how to fix this error on your own
Overview of ‘Windows Cannot Be Installed to This Disk MBR’
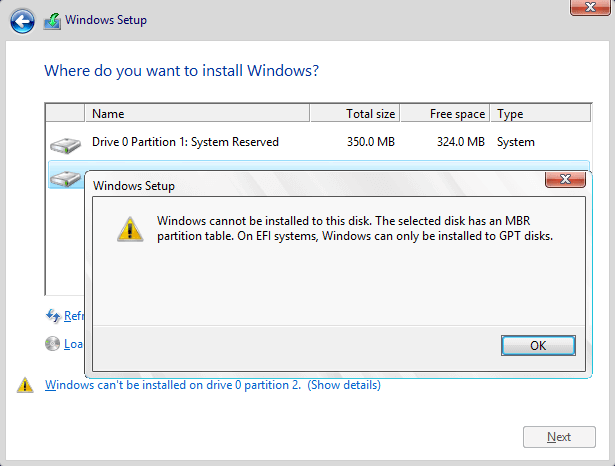
The issue ‘Windows cannot be installed to this disk MBR’ indicates the error message ‘Windows cannot be installed to this disk. The selected disk has an MBR partition style.’ It may appear during the Windows installation process and you cannot install Windows successfully unless you solve it. Another similar error is ‘Windows cannot be installed to this disk. The selected disk is of the GPT partition table.’ This article will tell you how to fix them accordingly and why these errors occur.

How to Fix ‘Windows Cannot Be Installed to This Disk MBR’
How do you fix ‘Windows cannot be installed to this disk’? The error message itself has given the answer: change MBR to GPT. Then how can you convert MBR to GPT? There are three methods.
- Method 1. Convert MBR to GPT without Data Loss
- Method 2. Convert MBR to GPT with Disk Management
- Method 3. Convert MBR to GPT with Diskpart
Method 1. Convert MBR to GPT without Data Loss
First, we’d like to recommend an easy and handy tool – EaseUS Partition Master. It will help you to create a bootable USB/CD packaged with the utility, with which you can boot your computer and then use it to change the disk from MBR to GPT. Most important, you can convert the disk without deleting any existing partition and erasing any data.
Key features of EaseUS Partition Master:
- Convert between MBR and GPT easily and freely.
- No data erasing or partition deleting during the converting process.
- Not a throw-away tool. Also supports users to resize/move, merge, or clone partitions.
- 100% secure. Approved by authorized agencies like SOFTPEDIA, PCWorld, Techradar, etc.
Step 1. Prepare a disc or drive, like a USB drive, flash drive, or a CD/DVD disc. Correctly connect the drive to a bootable computer. Then, launch EaseUS Partition Master, find the “WinPE Creator” feature and click on it.
Step 2. Choose USB or CD/DVD according to the device you connect to the computer, then click “Proceed”.
Step 3. Connect the WinPE bootable disk to the computer. Restart your computer and press F2/Del at the same time to enter BIOS. Set to boot the PC from “Removable Devices” (bootable USB disk) or “CD-ROM Drive” (bootable CD/DVD) beyond Hard Drive. Press “F10” to save and exit.
Step 4. Launch EaseUS Partition Master again. Right-click the MBR disk that you want to convert and select “Convert to GPT”. Then, you will add a pending operation.
Step 5. Click the “Execute Operation” button at the top-left. Next, click “Apply” and begin to convert the MBR disk to GPT.
There is a video tutorial about how to interconvert between MBR and GPT disk with EaseUS Partition Manager. Take a look and try to convert MBR to GPT without data loss.
Method 2. Convert MBR to GPT with Disk Management
You can also convert the disk type in Disk Management on your computer. Besides, to delete a volume, and to extend and shrink a volume are also available with Disk Management. Please follow the steps below to see how to convert the disk from MBR to GPT. This method involves a volume deletion. Please make sure you have made a full backup.
Step 1. Enter Computer Management.
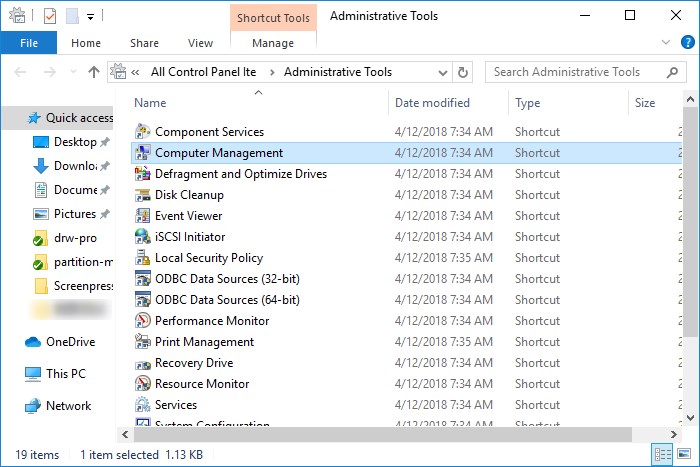
Go to Control Panel, head to Administrative Tool, and choose “Computer Management”. You can also right-click “This PC”, and choose “Manage” to enter the Computer Management.

Step 2. Delete the Target MBR Volume.
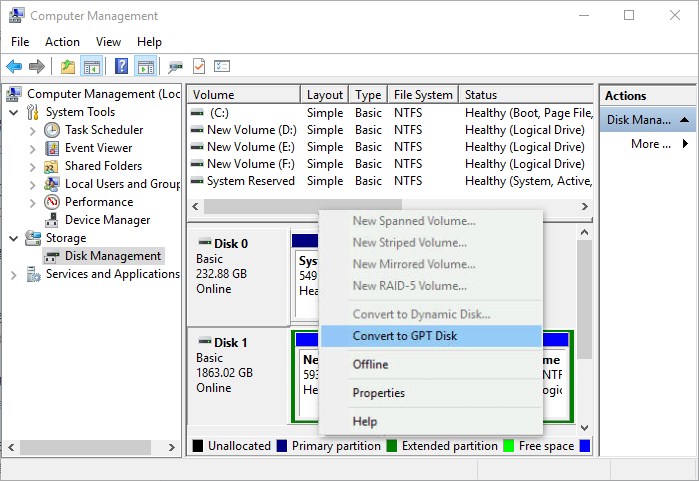
Click “Disk Management”, you can see all your disk volumes here. Right-click one volume and choose “Delete Volume”. Repeat the process to delete all the volumes.

Step 3. Choose Convert to GPT Disk.
Now right-click the MBR disk and choose the option of “Convert to GPT Disk”.

Method 3. Convert MBR to GPT with Diskpart
If you attempt to install Windows via the Windows installation DVD or USB, you can also apply it to convert MBR to GPT. However, this method will erase all the existing files on the disk. If you prefer to avoid data loss, you need to use Method 1 or back up your files on the disk with the file backup software – EaseUS Todo Backup. To make a backup of the MBR disk, you also need to create a bootable device via the software.
Step 1. Turn off the PC and put in the Windows installation DVD or USB.
Step 2. Boot the PC from the DVD or USB.
Step 3. In Windows Setup, press “Shift + F10” to start Command Prompt.
Step 4. Enter the following command in order to convert the MBR disk to GPT:
- diskpart
- list disk
- select disk 1 (choose the disk you want to install Windows on)
- clean
- convert gpt
- exit
After entering the above command, close the Command Prompt and continue the Windows installation.
Cause of ‘The Selected Disk Has an MBR Partition Table’
The error message itself has already given you the reason why Windows cannot be installed on the MBR disk. That’s because your computer has an EFI system, which is not compatible with an MBR disk. It means your computer’s hardware doesn’t allow you to boot from a disk with the MBR partition table. However, many users have confused about what the MBR partition table is, what an EFI system is, and why can’t Windows installed on an MBR disk on an EFI system. Here are the answers.
What is an MBR Partition Table
The partition table decides the layout of the hard drives like an HDD or SSD and tells Windows how to access the data on it. MBR partition table is a traditional partitioning method that supports disks with a maximum size of 2TB. Besides, MBR has a limit that you can create at most four primary partitions on the MBR disk.
Contrary to MBR, the GPT partition table is a newer standard for disk partitioning. GPT supports disks larger than 2TB and has theoretically no limit on how many partitions you can create on the disk.
Both MBR and GPT are the frequently used partition styles on computers. For more introduction, refer to the article about MBR vs GPT.
What is EFI
Most of the computers use either of the boot mode: BIOS or UEFI (Unified Extensible Firmware Interface). The EFI, Extensible Firmware Interface, is the name of the partition that stores the UEFI boot files.
Why Cannot Windows Be Installed to the MBR Disk
MBR disks use the standard BIOS partition table and GPT disks apply UEFI. That means if your computer has the traditional BIOS firmware, you should install Windows on an MBR disk. Similarly, if the computer is UEFI-based, you can only install Windows on a GPT disk.
You are now clear about why the prompt saying ‘Windows cannot be installed to this disk. The selected disk has an MBR partition table.’ appears. That’s because you are trying to install Windows on an MBR disk on the computer which has UEFI firmware, which is incompatible.
The Bottom Line
The only solution to ‘Windows cannot be installed to this disk MBR’ is to change MBR to GPT. To get it done, you can either use the partition tool – EaseUS Partition Master or Windows installation DVD/USB, depending on whether you want to keep the files on the MBR disk. Hope this article can help you solve the problem successfully.
Related Questions
There are some hot issues related to MBR disk you may be interested in.
“How do I change MBR to GPT?”
If the computer can boot properly, you can change MBR to GPT via Disk Management. If your computer cannot boot, you can use EaseUS Partition Master or Windows installation media to convert MBR to GPT.
“How do I get rid of the MBR partition table?”
The partition table is necessary to use a disk. Thus, you cannot simply get rid of the MBR partition style. Instead, you should convert it to GPT if you don’t want it.
“Can Windows 10 installed on MBR partition?”
Whether you can install Windows on MBR or not depends on the firmware of the computer. You can Windows 10 install on MBR partition if the computer is BIOS-based or UEFI-based with BIOS-compatibility.
“Can Windows 11 be installed on MBR disk?”
No! Actually, Windows 11 requires secure boot mode which only works on UEFI boot mode, and as UEFI boot requires GPT disk type, you’ll need to convert the OS drive into GPT before installing or upgrading to Windows 11.
- Share CrocoBlock key trọn đời Download Crocoblock Free
- Cung cấp tài khoản nghe nhạc đỉnh cao Tidal Hifi – chất lượng âm thanh Master cho anh em mê nhạc.
- Top điện thoại 5 triệu tốt nhất 2018
- Cách Đăng Ký Cuộc Gọi Người Nghe Trả Tiền Của Viettel – Collect Call 1588
- Các trang web bạn có thể tải ebook kindle miễn phí
- Cách kiểm tra quạt laptop có chạy không cực đơn giản, ai cũng làm được – friend.com.vn
- Top ứng dụng tăng âm lượng cho điện thoại Android nên dùng
Bài viết cùng chủ đề:
-
TOP 7 phần mềm khuếch đại âm thanh cho laptop, PC, máy tính tốt nhất
-
Hướng dẫn kết nối điện thoại với loa mini đơn giản hiệu quả nhanh nhất
-
Top 12 phần mềm, web chuyển mp4 sang mp3 online, miễn phí, dễ sử dụng
-
Hình nền máy tính 4K cực đẹp – Tổng hợp hình nền, Wallpaper 4K đẹp cho máy tính
-
Kaspersky Key ( Free 91 days ) new update 2019 – All Product Key
-
Cách chạy file DMG trên Windows, mở, xem file DMG trên máy tính
-
Cách giảm dung lượng video trên máy tính và điện thoại
-
Bật Gps iPhone 6, bật tắt định vị trên điện thoại
-
Hỏi đáp: ăn chay ăn trứng gà công nghiệp có được không
-
Sửa lỗi mã hóa ký tự bị hỏng, bị lỗi trên Word 2019, 2016, 2013, 2010
-
10 Chuyện Tâm linh có thật – Nơi thế giới vô hình huyền bí
-
100+ Hình nền, ảnh Anime nữ cute girl, dễ thương máy tính, điện thoại
-
Hướng dẫn xử lý lỗi iphone 6 plus không nhận vân tay
-
Bí quyết bắt Pokemon không cần di chuyển
-
Perfect Money là gì? Hướng dẫn sử dụng PM mới nhất 05/10/2021
-
Làm Sim Sinh Viên,Chuyển đổi gói cước Viettel,Vinaphone,Mobile tại simredep.vn


